Single sign-on (OIDC)
Single sign-on (SSO) lets people sign in to Initiative with an account they already have — from a provider like Microsoft Entra ID, Google, Okta, Keycloak, or Authentik. Initiative supports the OpenID Connect (OIDC) standard. You configure it from Settings → Platform → Auth as the owner.
Why use it
- People don't manage a separate Initiative password.
- Your existing password policy, multi-factor authentication, and account de-provisioning apply automatically.
- You can map groups from your provider to Initiative guilds and roles, so the right people land in the right place on first sign-in.
Make sure APP_URL is set and reachable
OIDC relies on redirecting back to Initiative at known URLs. Set APP_URL to your real public address (see Configuration) before configuring SSO, or the callback URLs will be wrong.
Setting it up
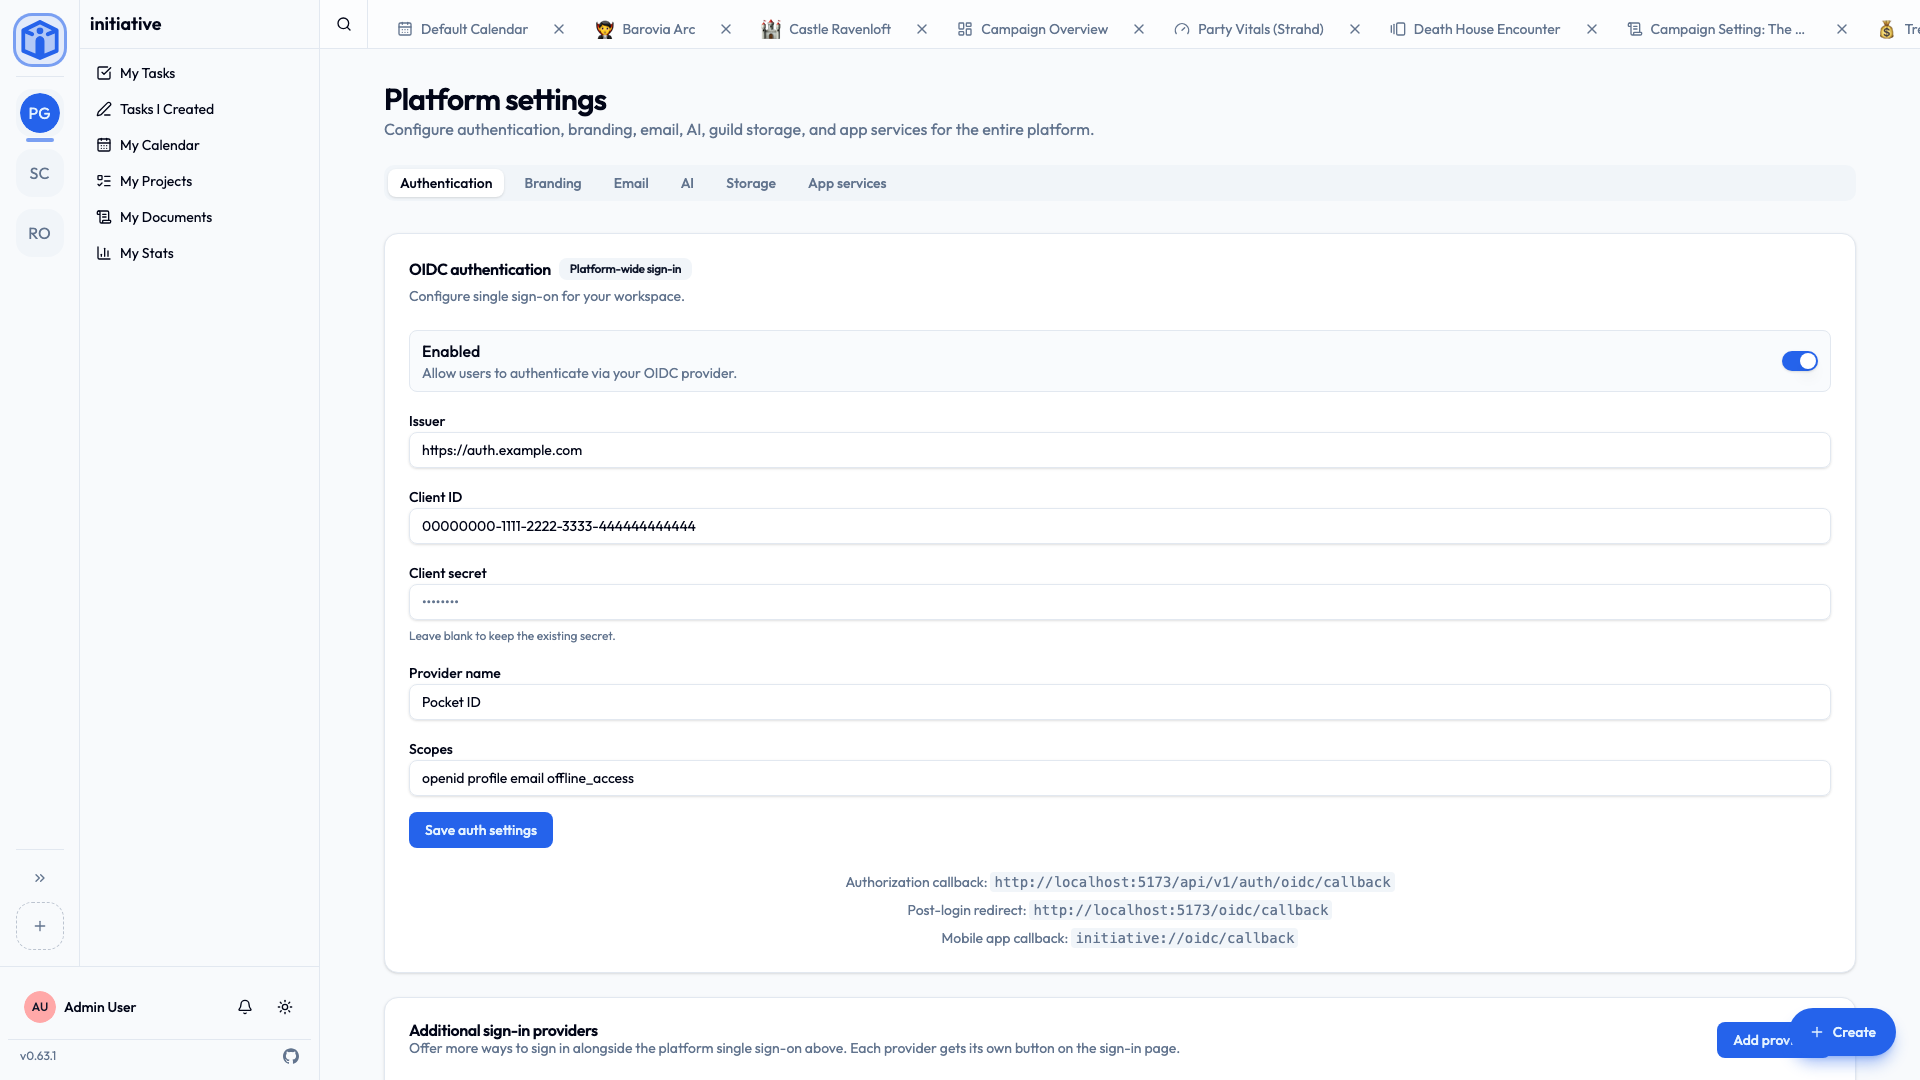
In Settings → Platform → Auth, you'll provide:
| Field | What to enter |
|---|---|
| Enabled | Turn SSO on. |
| Issuer | Your provider's base URL (e.g. https://accounts.example.com). |
| Client ID | The client/application ID from your provider. |
| Client secret | The matching secret. (Leave blank when editing to keep the existing one.) |
| Provider name | The label on the sign-in button (e.g. "Company Login"). |
| Scopes | Usually openid profile email offline_access. |
Initiative shows you the callback URLs to register back in your provider:
- Authorization callback — the main redirect URL.
- Post-login redirect — where users land after signing in.
- Mobile app callback — for sign-in from the mobile apps.
Copy these into your identity provider's app/client configuration.
Provider-specific setup
Initiative works with any standards-compliant OIDC provider — you point it at your own identity provider, and Initiative signs people in against it. In every case the result is the same three values to paste into Settings → Platform → Auth — an Issuer, a Client ID, and a Client secret — plus registering the callback URLs Initiative shows you. Use the scopes from the table above.
Here are quickstarts for the providers self-hosters reach for most.
A lightweight, passkey-only provider — a popular pairing with Initiative.
- In Pocket ID, go to OIDC Clients → Add client and name it "Initiative".
- Set the Callback URL to the Authorization callback shown on Initiative's Auth page.
- Save, then copy the generated Client ID and Client secret.
- In Initiative, set Issuer to your Pocket ID address (e.g.
https://id.example.com) and paste the Client ID and secret.
Because Pocket ID has no passwords, everyone signs in with a passkey — your Initiative sign-ins inherit that automatically. To sort people into guilds, enable groups in Pocket ID and set the Claim path to groups.
- Create a Provider → OAuth2/OpenID; set the Redirect URI to Initiative's Authorization callback and note the generated Client ID and Client secret.
- Create an Application and bind the provider to it.
- In Initiative, set Issuer to
https://authentik.example.com/application/o/<application-slug>/and paste the Client ID and secret. - For group mapping, add the
groupsscope to the provider and set Initiative's Claim path togroups.
Authelia's OIDC is configured in its YAML, not a UI.
- Under
identity_providers.oidc.clients, add a client with aclient_id, a hashedclient_secret,redirect_uris(Initiative's Authorization callback), andscopes: [openid, profile, email, groups]. - Restart Authelia to apply.
- In Initiative, set Issuer to your Authelia address (e.g.
https://auth.example.com), and paste the Client ID and the plaintext secret.
- In your realm, create a Client (OpenID Connect) with Client authentication on, and set a Valid redirect URI to Initiative's Authorization callback.
- From the client's Credentials tab copy the Client secret; the Client ID is the client name.
- In Initiative, set Issuer to
https://keycloak.example.com/realms/<realm>and paste the Client ID and secret. - For roles, add a groups (or roles) mapper to the client and set Initiative's Claim path to
groups(orrealm_access.roles).
Hosted providers work the same way — register an app, add Initiative's callback URL, and copy the Issuer, Client ID, and secret.
- Microsoft Entra ID issuer:
https://login.microsoftonline.com/<tenant-id>/v2.0 - Google issuer:
https://accounts.google.com - Okta issuer:
https://<your-org>.okta.com
Mapping provider groups to guilds and roles
This is the powerful part. You can have Initiative read a claim from the sign-in token (for example, the user's groups or roles at your provider) and automatically place them into guilds and initiatives.
- Set the Claim path — the dot-notation location of the claim in the token (for example,
roles, orrealm_access.rolesfor Keycloak). - Add mapping rules. Each rule matches a claim value and assigns:
- a target type: Guild only, or Guild + Initiative;
- the guild (and guild role: Member or Admin);
- optionally the initiative and initiative role.
So a rule might say: anyone whose roles claim contains theatre-leads becomes an Admin of the "Riverside Players" guild. New people from your provider are sorted automatically the first time they sign in.
For the technically minded — how the mapping is evaluated
On each OIDC sign-in, Initiative reads the configured claim path from the ID token, then applies every matching rule to grant the corresponding guild/initiative memberships and roles. PKCE is used in the authorization flow. Mappings are applied idempotently per sign-in, so they reconcile membership rather than duplicating it.
Related
- Configuration —
APP_URLand other foundational settings. - Platform roles — who can configure SSO.
- Signing in — the user's view of SSO.